We have designed Superbly to save time. There are a number of automations inbuilt to make the message creation and sending quicker. This guide will take you through the key steps to make your job easier.
Messages can be broken into 4 key components:
- Message Set Up
-
Writing the Message Content
- Selecting students
- Add Students to Class
Message Set Up
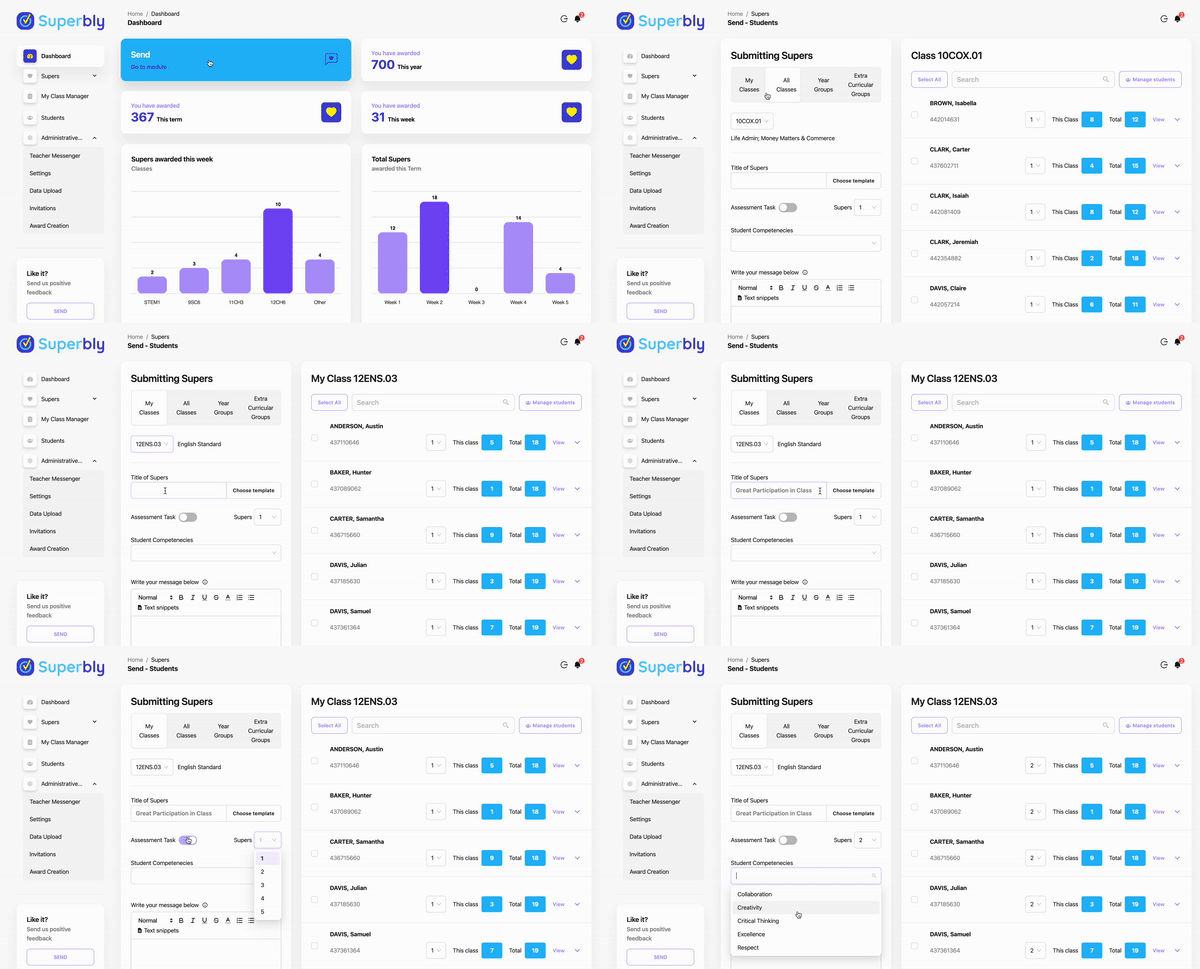
There ara few quick steps for setting up your message. If you plan on sending a message to 1 student, a whole class or the entire year it can be done quickly and easily here.
- Select Class - Selecting your students is easy! Choose between my classes, all classes, year groups or extra curricular groups
- Add a title - this title wil appear on the email the parents receive and the message the student receives in their app. The format of the email title is "Supers - Adam - English Standard - Great Participation in Class" - Titles can be saves as templates if it is used often.
- Select the number of points allocated to the student. Assessment tasks can also have an additional amount (this can be set in the administration settings)
- Add Student Competencies - choose from the drop down list (multiple competencies can be used). Competencies can be added or remove in the administrative settings.
Writing the Message Content
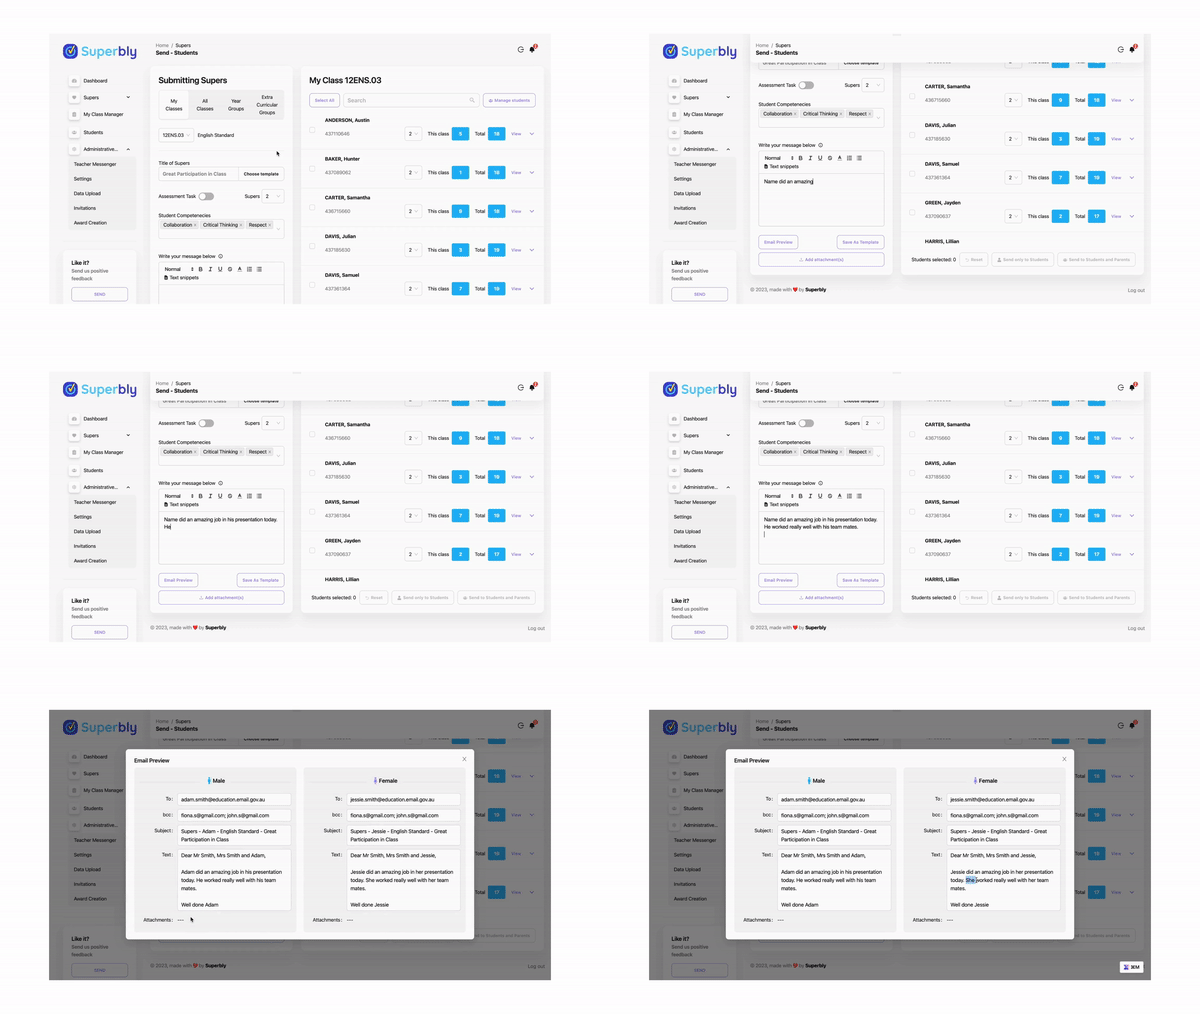
There are number of clever short cuts built into the content writer to make message writing faster and more intuitive.
- The quickest way to write messages is to free write using the following rules:
- Instead of writing the student’s name (such as George) write → Name. (Example: Name did brilliantly today in Science.)
When tagging multiple students, their names will then be populated instead of Name.
- Instead of writing the student’s name (such as George) write → Name. (Example: Name did brilliantly today in Science.)
- When sending to multiple students (male and female) including gender pronouns - write in the masculine form (He, his, him).
- Example: Name did brilliantly today in Science, his presentation was fantastic.
- This will then automatically replace the male pronouns to female pronouns for female students.
- Alternatively - click on “Text Snippets” and insert the snippets for your message which will automate and personalise your message.
- Click on “Email Preview” to view what the final email to parents will look like
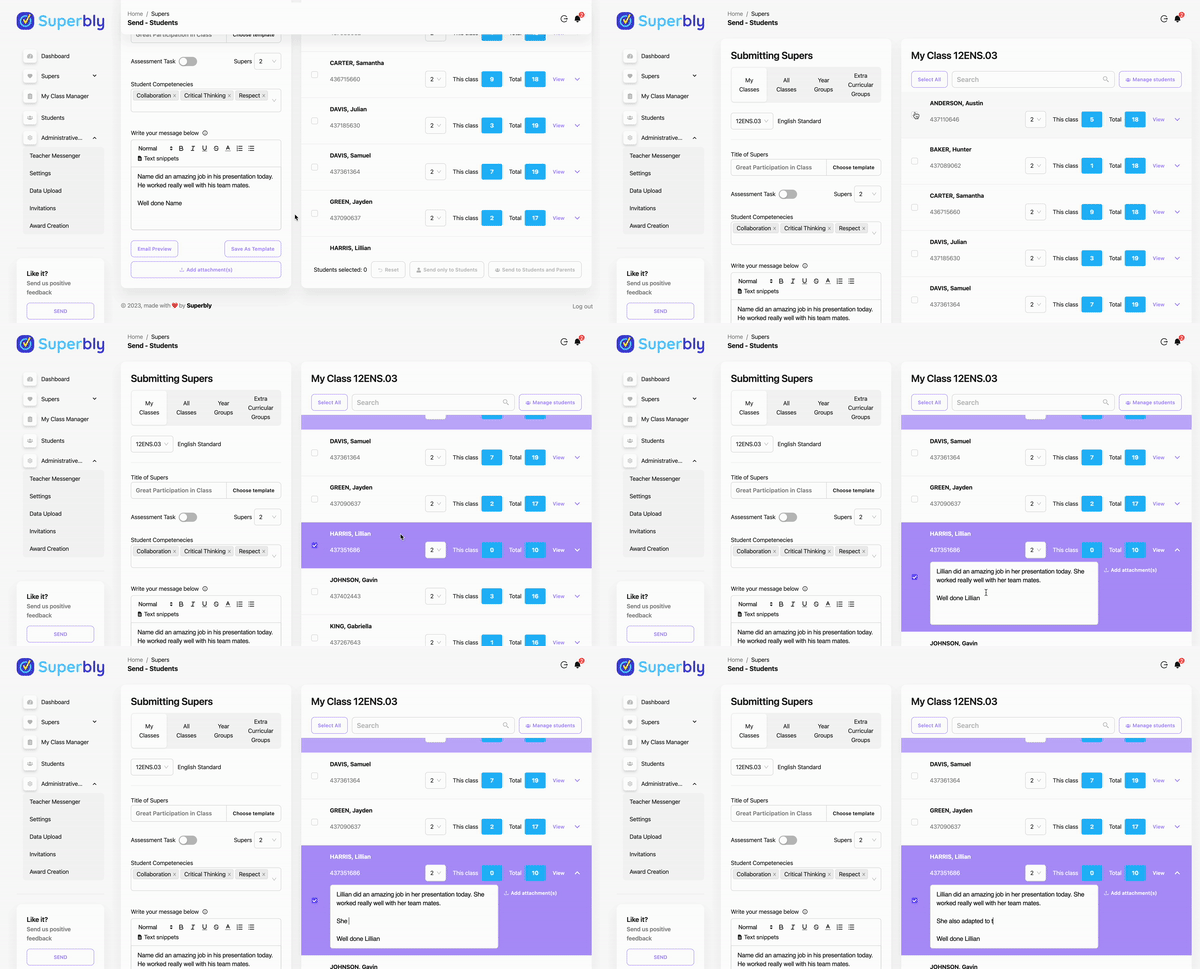
- Click “View” next to the student name on the right hand panel in the class list to see what the message for the specific student looks like. This can also be edited if you need to add an additional personal message
- After composing, you have the option to save messages as templates for future use
Selecting students
Selecting students and personalising individual messages has never been faster.
You can send a message to the entire class or personalise a few messages for individual students. Here's how to make sending messages quick and easy.
- Select all students or individual students from the class list or year group by checking the box at the top or next to each student
- Personalise the student message by expanding the message, click on the down arrrow on the right
- Add additional content into the message box
- Adjust the points allocated if required per student
- Scroll to the bottom and select "send only to student" or "send to students and parents". Sending to parents will package the message in an email and send it directly to the parent inbox.
Creating Extra Curricular Groups
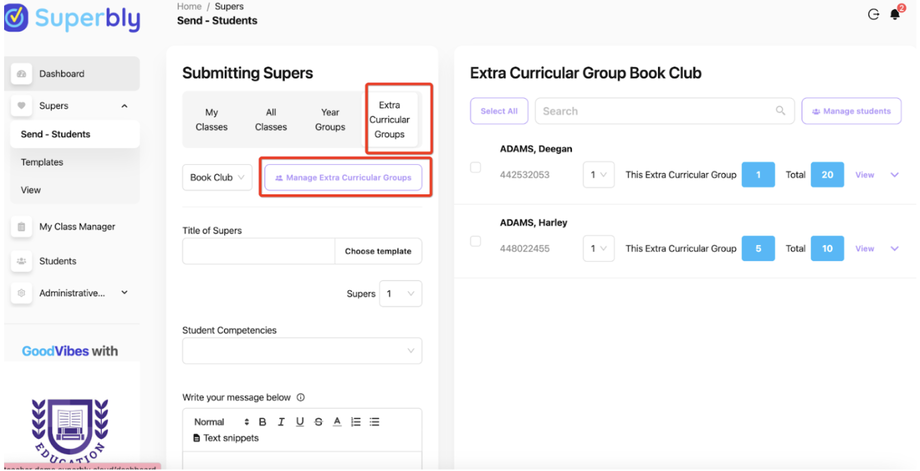
Extracurricular groups can be created in Superbly. Examples may include School Clubs, Sports Teams, Special Events (carnivals) etc.
These events often involve special contributions. The administrator may set the Extra Curricular activity so that more Supers can be awarded compared to regular school/class activity.
To create a new group
-
Click on “Extra curricular groups”
-
“Manage Extracurricular groups”
-
“Add” and create a group name
-
“Manage students” to add students to the group
To use a group
-
Click on “Extra curricular groups”
-
“Manage Extracurricular groups”
-
Click “Use” - the students in the group will then populate in your class list, ready to send Supers
Add Students to Class
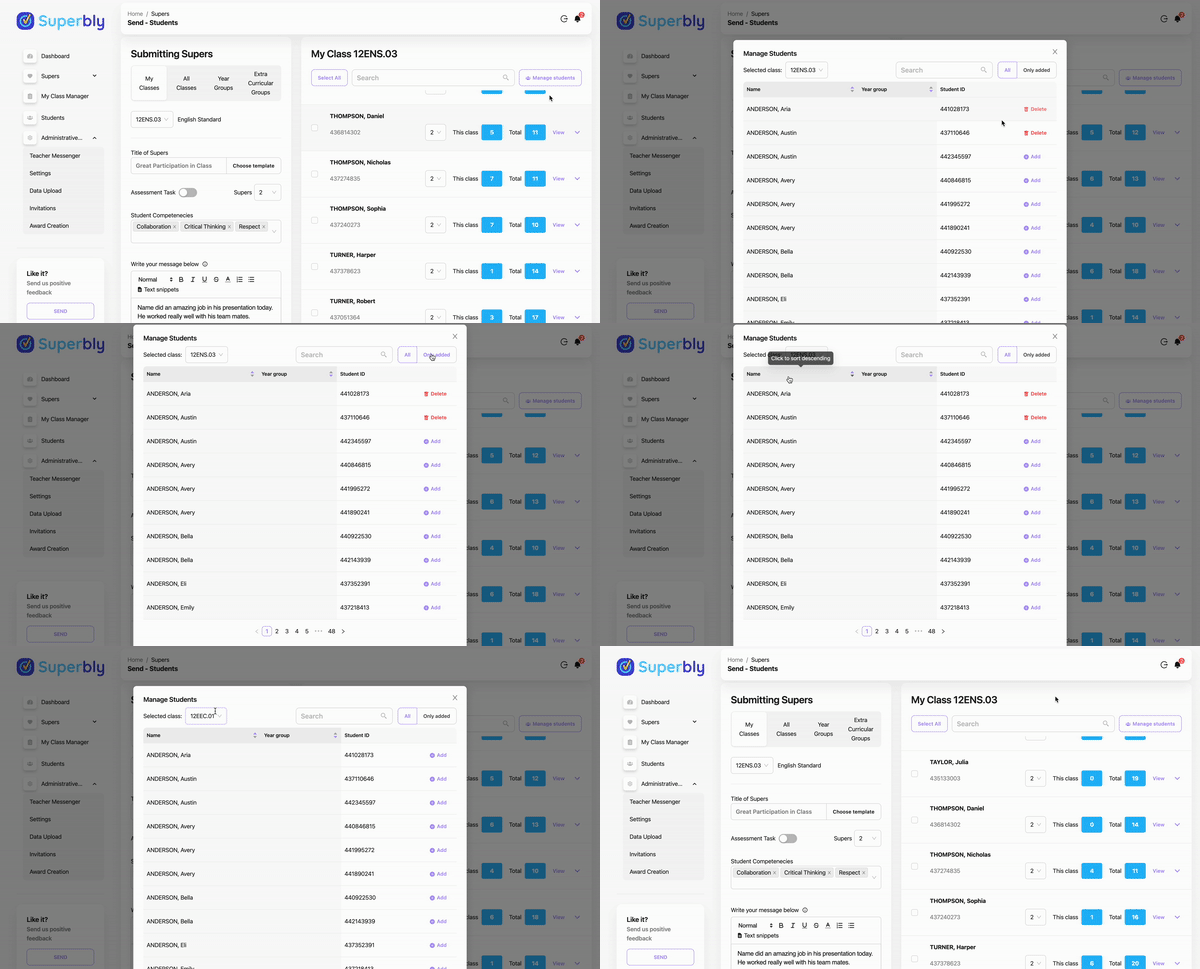
Sometimes new students arrive or students change classes, this isn't a problem they can manually be added to your class list.
- Scroll to the top of the students list on the right
- Click on the "Manage Students" button
- Click "Add" next to each student or delete to remove a student
- This can be done for other classes by selecting the class from the class drop down menu on the top left and repeating
Ok you are now ready to send as many messages as you please.
Creating Extra Curricular Groups
Extracurricular groups can be created in Superbly. Examples may include School Clubs, Sports Teams, Special Events (carnivals) etc.
These events often involve special contributions. The administrator may set the Extra Curricular activity so that more Supers can be awarded compared to regular school/class activity.
To create a new group
-
Click on “Extra curricular groups”
-
“Manage Extracurricular groups”
-
“Add” and create a group name
-
“Manage students” to add students to the group
To use a group
-
Click on “Extra curricular groups”
-
“Manage Extracurricular groups”
-
Click “Use” - the students in the group will then populate in your class list, ready to send Supers


